Tuesday, December 19, 2023

Kees Bijker's 3-D Printed V4 Update

Hello Allen,

I wish you and all your loved ones a Merry Christmas and a Happy New Year. This is the last update of 2023 of my 3d printable Howell V four. Nearly done and still so much to do. Got 99% of the parts printed now and just need to figure out some minor improvements for printing and fitting. Then it is back to the printer and printing all the final versions and creating a bom list and build instructions. This will be 2024 I am sure. The camshafts prove difficult and I have printed 4 different iterations without luck so far. This last one has to be the one. Going to print it with a much smaller nozzle and lower speeds for high definition. Should do the trick. Enjoy the festivities and hope to hear from you either this year, if not next.

Kind regards, 
Kees.

Friday, September 8, 2023

Alan Gorlick's BuzzCoil Review and Comments

 Hi

Just a note to let you know the "buzz coil" ignition module kit, spark plug & hall effect sensor are installed and working well on a hit & miss engine that I have just finished, it's based on a David Kerzel design. 

I am using a 2mm x 1mm magnet set in the cam gear at 0.5" radius which works very well at the low speed of this engine. The hall effect sensor is epoxied onto an arm that can pivot around the cam gear shaft as suggested in your notes. That change to Mr Kerzel's design made setting the ignition timing extremely simple and precise. The coil is a universal ATV coil and is the only thing in the ignition system that has caused any problems. The first one had a loose primary terminal.

I did successfully bench test the spark saver circuit with a second hall effect sensor but have only installed the single sensor circuit as battery capacity has not been an issue. I am using a 6V 4.5ah rechargeable lead acid battery (AGM type) which I haven't had to recharge yet and cost very little more than a pack of 4 AA energisers and case.

One low cost change that I suggest you could make to your kit is to use an 8 pin IC socket that is soldered onto the PCB first and the 555 Timer IC just clips into that socket after everything else is installed. It removes any risk of exposing the 555 to the heat of soldering and allows easy replacement of the timer if ever required.

Thanks for the quality product,

Regards
Alan Gorlick
Bundaberg, Queensland, Australia


Monday, April 10, 2023

Mark Journee's Farmboy #995

 Hello Allen 

Thanks again for the drawings i have finished the engine. it was a great project to make here are some pictures of the farmboy #995.


kind regards.

mark journee from the netherlands


Friday, March 17, 2023

Mark Journee's Farmboy #995 (so far)

 Hello Allen 

First of all thank you very much for the plans!   I'm almost in love with making the parts.  I've made some progress since I have some free time at the moment. I make the farm boy a little bit different from the original but here are some pictures of the engine:


Kees Bijker's Flathead V8 vs Howell V4

 Hi Allen,

A "little" comparison with my previous Ford V8 flathead 1:3 model I made.

Your father's V4 is really tiny.

I am hoping that the Howell Vfour will end up looking just as nice. (Don't look at the engine stand yet, that was a fail to be rectified soon).

Take care.

Kees


Tuesday, March 14, 2023

Kees Bijker's 3D printed V4

 Kornelis Bijker from The Netherlands is building a 3D printed version of Dad's V4 engine.  Here's his latest update:

----------------------------------------------------------------

"Hello Allen,

It is quite the trip I have to say. I think I have 95%+ of all the parts modeled by now, and started modifying the fits, fasteners and certain details for 3d printing.

Things like the con rods I cannot print in one piece, so I had to modify them to have a bearing cap, a very small bearing cap. The miniature bearings are 2.5 mm wide so the bolts holding them on will be just M1.4, the tiniest I have ever used.

Most of the original designs I try to keep, but some parts are simply to difficult to print like that.

The guts of the engine will have all working mechanics, like crank, pistons, cams and timing gears, lifters and moving pulleys.

But internals of pumps and ignition will not have moving mechanics. Simply too small and too detailed for FDM printing to work well. And in a plastic model without petrol combustion, I do not need cooling or oil anyway.

Still not sure where I will build in the electrical motor. If not inside the crank case I might have to "invent" some fictional starter motor. Maybe a bell-house with a large gear instead of the flywheel. Not decided yet.

But as of now the fasteners have been modified to metric, so have most of the bearings. They are easier to find here then the ANSI style and imperial bearings.

I also have started printing things, mostly as a test to help decide tolerances and such.

I was quite happy that the fan shroud printed as well as it did. Also happy how the radiator insert came out, you can actually see through it.

Some things still to do are the throttle linkages, and yes the distributor will advance as well. I also will attempt to connect the speed potentiometer with the throttle link so that the engine will respond to the throttle. The sound is another story."

------------------------------------------------------------------------------

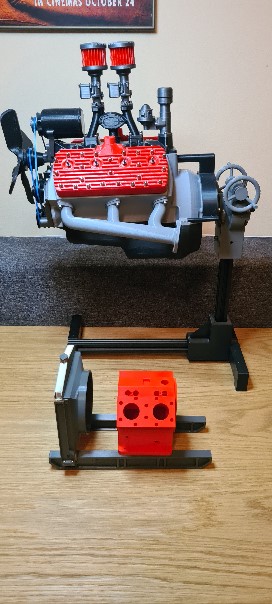
The first 4 images are the 3D software renditions of the V4, and the last three are actual 3D printed radiator parts.  Nice job Kees!  Looking forward to seeing this to completion!


March 21st Update:

Hi Allen,
Plodding on with modifications and printing and now also building.
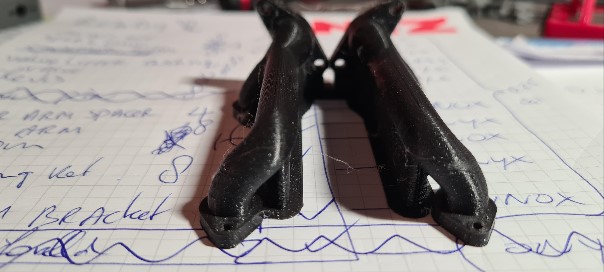
The engine casing still needs cleaning up but I have started with the heads now. Some photos showing the tiny parts on a background of my notes for printing.
In view also the hand tools for this minuscule work. M2 hand-tap in a tap spinner and the M2 Allen key. Some photos show how the parts come off the printer. Looks a bit like an air-fix kit when they are all attached to each other. Right now printing the rocker arms and other small parts to complete the heads. I keep saying "other small parts", but to be honest all of it is small. Anyway next week I will be on holiday so no work on the engine for 2 weeks.
So far I have modified the valves to take a M3 bolt as a stem and the push rods with valve lifter to be made from a ground to shape M3 bolt as well. I am printing the clevis, as this is a really neat part that needs to look right.
Long way to go still.


Second email with more pictures and a section view of the engine to show the new valve and push-rod. setup. I have had to do away with the valve lifters and the ground down bolt head will take its place. The next email with the section view will show this


Sunday, January 1, 2023

Glen Monk's Farmboy #899

Here's a nice letter w/photos I received from Glen Monk of Pensacola, FL